Friday, September 26, 2014
Check this out! A New Way To Shop Stampin' Up!
This is a cool new feature/tool I've learned to use....check it out and tell me what you think...do you like it? Is it all working for you?


Monday, July 7, 2014
Designer Series Paper: Buy 3 Get 1 FREE!
Looking for paper? Stampin' Up! now has it's beautiful collection of designer series paper on sale now...Buy THREE get ONE free!
Shop online....anytime!
Shop online....anytime!
Monday, July 29, 2013
Image Editing Tips using GIMP
At Stamping and Blogging, you get the best of both worlds! Over 180 videos, where we are building our video library on "How To Setup a Blog". However, here is one of our public free videos on how to use GIMP, a free image editing program, to help you resize and edit your images for blogging!
Additionally, you may download this free accompanying tutorial on "How To Edit an Image Using GIMP".
Enjoy!
Tuesday, January 15, 2013
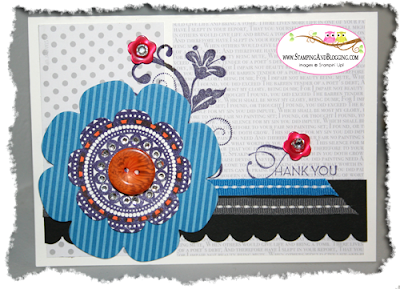
Lacey and Lovely SB5 Sketch Challenge
Saturday's are my stamping days! I had fun today creating this one! It took a lot of time because of all the Rhinestones (LOL) but I really do like how it came out and the blue, orange and pink accents on the gray and blank. Don't you?
Instructions To Create This Lacey and Lovely Card
- So, basically I took a piece of the piece of the Neutrals Designer Series Pack and then cut it. It is double sided so I then flipped the one side over! So one piece of paper = two designs. Very cool! Then adhered it to the white card base using SNAIL adhesive.
- Then stamp the flourish swirl using the Flowering Flourishes stamp set. Yes, some areas I filled in with Basic Black Stampin' Write Marker!
- Next, cut the piece of Basic Black card stock and used the Scallop Edge, and adhered it using SNAIL adhesive.
- Next, added the ribbon adhering using the SNAIL and Mini Glue Dots.
- Next, used the Floral Frame Framelists (3rd size) to die cut the Pacific Point flower (paper from the Brights Designers Series Pack).
- Next, stamped the Lacely & Lovely image in Basic Black Ink. Then used the 2nd Floral Frame (from Floral Frames Framelits) to cut it to a flower shape. Then colored one of the edges with the Pumpkin Pie Stampin' Write Marker. Next, added Rhinestones near the center, outside where you see the Button.
- Adhere the stamped image to the Pacific Point paper using SNAIL, then adhere the flower to the card using Stampin' Dimensionals.
- Last but not least I added the Pink buttons (adhering using Mini Glue Dots) and added the Rhinestones to the centers.
Here are the Stampin' Up! Products Users to Create This Lacey and Lovely Card
- Neutrals Designer Series Paper Stacks (12x12): $21.95, Item #117157
- Brights Designer Series Paper Stacks (12x12): $21.95, Item#117155
- Neutrals Card Stock (so you have the Black and White paper): $6.95, Item #119707
- 1/4" Stitched Grosgrain Ribbon Pacific Point, $4.95, Item #126878
- 1/4" Stitched Grosgrain Ribbon Basic Gray, $4.95, Item #126879
- Brights Designer Buttons, $8.95, Item #119747
- Rhinestone Basic Jewels, $4.95, Item #119246
- Floral Frames Framelits, $26.95, Item #127012 (requires the Big Shot)
- Scallop Edge Border Punch, $15.94, Item #119882
- Glue Dots, $4.95. 103683
- SNAIL Adhesive, $6.95, Item #104332 (or refill, $4.50, Item #104331)
I hope you enjoyed today's card and hope you over and stamp with us at http://www.StampingAndBloggingBLOG.com and join our Saturday Sketch Challenge #5 (SB5). Thanks!
Click here to shop now with me! Or you may email me with your order.
Tuesday, December 11, 2012
Come Create With Us!
This is a test Blogger blog used solely for our Stamping and Blogging video library. We are currently testing Domain Mapping with Blogger. Want to learn how? Come visit us at Stamping and Blogging! Click to learn more.
Come create with us!
Subscribe to:
Comments (Atom)


